Tag Archives: Instructions

3 Common English Verbs and their Synonyms: see, know, search for

A test tube is held up by a gloved hand to a color chart. The color of the contents of the tube are olive green, a match on the chart for pH 6.5 Slight Acid.

As I searched for ideal growing conditions, I needed to look at my soil to figure out if it was healthy. Photo by Laura Cathey, 2016. CC-BY-SA

Word choice can be the shibboleth that reveals an English learner’s intermediate level, even if the student is a hard worker well on their way to fluency.

Common verbs “see, know, and search for” can be a struggle to distinguish from their synonyms. The downloads at the end of this post contain sample sentences appropriate for intermediate English as a Second Language (ESL) students to work on improving in this area.

A Challenge for Beginners and Beyond

These three verb families are ones where I’ve heard both beginning and high intermediate students make mistakes. An intermediate student might know they’re making a mistake and be able to ask, “Did I ‘watch’ TV or ‘see’ it?” But students may also not notice when they’re on shaky ground and get themselves into trouble.

I worked with one beginning student who would tell me after any instruction I gave him, “I know.” For months I thought of him as somewhat arrogant – of course he didn’t know, we were spending our lessons correcting his mistakes. Finally I realized his intention was to say, “I understand” – conversationally, almost the opposite sentiment. But my perception of him even as his tutor had been swayed by this mistaken word choice.

Perception matters. When ESL students are interested in improving their employment opportunities, the bar is set higher than just being able to convey an idea. Their speech needs to be polished. A student’s aptitudes and professional accomplishments back home should earn them respect in an American professional setting, but mistakes in word choice have the potential to distract from that.

Improving Word Choice Between Synonyms

To build this skill, consulting the dictionary doesn’t help, as it often defines these words with one another. Intermediate print resources have a lot of ground to cover, and the ones available to me (I welcome any recommendations) avoided presenting anything close to hairsplitting that might trip up a student.

Sample sentences allow a student to examine and practice the differences between these verbs. These need to be sensitive to the way native English speakers use words across contexts, tones, and shades of meaning.

To practice, a student can read over the examples given, and then respond to a written or oral prompt to use all synonyms in a paragraph or short spoken answer. For example:

  • Use “watch, see, view, and look at” to describe going to the grand opening of a business or institution that interests you.
  • Use “know, understand, learn, find out, and figure out” to describe an aspect of American culture that was difficult for you at first.
  • Use “search for, seek, and look for” to describe collecting all the resources you need to complete a project at your work.

After initially studying these lessons, a student may hesitate in using these words while they rack their brains to remember the distinctions between them. You can encourage a comfort level by incorporating these words into future lessons and repeating the examples. From my own experience as a language student, there’s something comforting about hearing a familiar phrase repeated when I’m first learning it. The versatility of its other uses will come quick and fast outside the classroom.

watch / see / view / look at

These verbs of vision have distinctions based on what is being observed: does it move? Is it text? For each verb, a sentence is included that deals with birds and one that deals with résumés, to show that the same things are being seen, but that we use different verbs to talk about them in different situations.

PDF file icon created by Chanut is Industries from Noun Projectwatch / see / view / look at

know / understand / learn / find out / figure out

These verbs differ based on how and when the knowledge was acquired – relative to the present moment. In a couple cases, I used two of the words in one sentence to show how they relate to each other or how they aren’t interchangeable.

PDF file icon created by Chanut is Industries from Noun Projectknow / understand / learn / find out / figure out

search for / seek / look for

These verbs come up often with new immigrant situations like moving and gaining employment. Which verbs take the preposition “for” is an additional challenge when choosing between these three – and a temptation to overuse “seek,” which is actually much less common.

PDF file icon created by Chanut is Industries from Noun Projectsearch for / seek / look for

Newspaper seedling planter

I tried a couple of the designs on the web and was not satisfied with their confusing design or their use of tape. This design is held in place when you put the potting mix in it, and lasts until you put it in the ground, when it starts to break down. I modified this origami pattern. If my instructions don’t work for you, they get the same result as Hometalk.com, but I saw their instructions and didn’t understand them, so here’s instructions for brains like mine. 

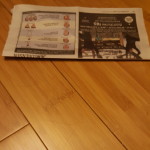
  1. Start with a small newspaper, like the ones full of ads that you mysteriously can’t unsubscribe from. Take one leaf from it and tear it in half, so you just have 1 page.  
    20160319_230253
  2. Fold in half down the midline (horizontally). 
    20160319_230309
  3. Open it back up and fold in half along the other midline (vertically).
    20160319_230335 
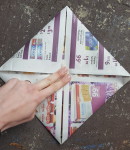
  4. Open it back up and fold all the corners to the center, which is where your previous folds meet. 
    20160319_230407 
  5. Starting with the bottom right corner, fold the outer edge to the center. 
  6. Then fold the resulting edge to the corner as well. 
  7. Open your last 2 folds back up and repeat steps 5 and 6 with the other three edges. It is pretty crumply now, but you will use these folds as guides. 
    20160319_230656
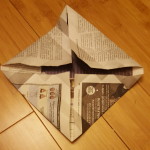
  8. Open two of the opposite flaps. 
    20160319_230727
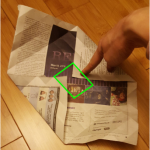
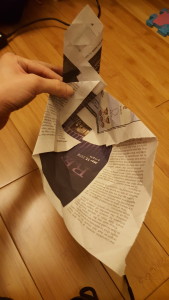
  9. You should see a small square in the very center, made from the creases we’ve been making. This is the bottom of the box. We’re going to be folding up around this square. 
    box
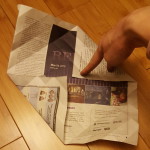
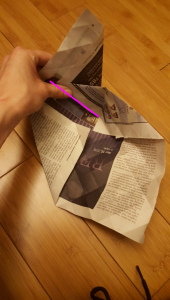
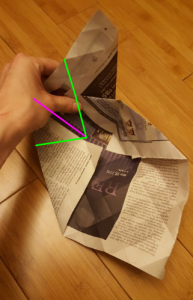
  10. To bring two sides of the box together, we’re going to fold the corner in. The green lines represent “valley” folds (go away from you) and the pink is a “mountain” fold (comes toward you). If you look on the outside of the box, you’ll see how you brought the two valley folds together and they meet at a point. 
    mountain valley 20160319_230931
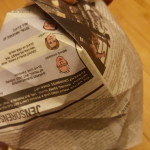
  11. Lay that corner along the opened flap side. You can see where your pink corner should be.
     corner crease
  12. Fold the other corner in by making two valley folds and a mountain fold again. 
    mountain valley2
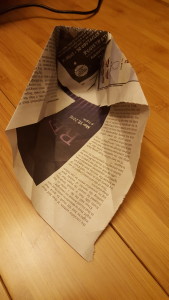
  13. Now we’ve got two out of four corners in place. Tuck the flap inside to hold our corners in place.
    20160319_231023 20160319_231057
  14. Using the littlest crease square as your guide, repeat on the other side to complete the last two corners. 
    20160319_231301

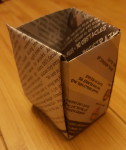
You did it! Happy planting. 
20160402_151846

Stuff I did to my workspace to fix my posture

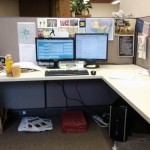
I sit in a cubical for 8 hours a day in front of a computer, and my right shoulder blade goes tingly. When the issue first started, it seemed to come and go for no reason, but working with a physical therapist made it clear that my posture was the issue, and certain things I did made it flare up. Mostly, it’s a long road toward increasing my body’s strength and flexibility, but some external changes have made a big difference, namely reconfiguring my desk. I did all this without waiting around for my employer to by me a $1000 standing desk, and the only thing I spent money on was two napkins, which cost a lot less than the visits to the physical therapist. So I thought I’d share these tips.

Goals

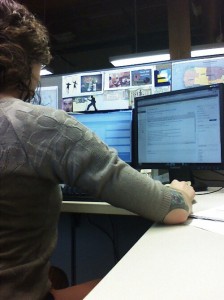
As you can see in the picture above, my elbow was elevated, which the physical therapist said was part of the problem, so I needed to remove the obstacles keeping me from putting my elbows at my sides.

Diagnosis: my scalenes and pectoralis minor were shortened and tight, whereas my levator scapulae and upper trapezius were over-lengthened. To counter this, my shoulders needed to relax down and back, and my head needed to sit further back on my neck and not crane forward.

Changes

Raise the chair

Since I’m short, I had originally lowered my desk chair as much as possible, so my feet wouldn’t swing like a child’s. This was a mistake, since the desk (which is immovable) is positioned for someone sitting higher up. Resting my elbow on the desk probably led to the tightening of my scalenes and pec minor since they were in a shortened position all day. So I raised the chair as high as possible to get to the right height for the desk.

Add a footrest

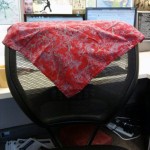
The new chair position meant I needed to add a footrest. I tried a couple cardboard boxes from around the office until I found one of the right height. To be cute, I bought a pair of cloth napkins at the thrift store and, with some skillfully applied binder clips, used one napkin to cover the cardboard box.

Remove the armrests

The armrests of the chair couldn’t go down very low, and my objective was to relax my shoulders as far as possible, even to get a little stretch. So I unscrewed the armrests from the bottom of the chair and stowed everything under my desk so it can be put back together for a future occupant.

Get the computer within reach

I moved my monitors out of the corner, so they are closer to me and so my keyboard is right at the edge of the desk. In addition, I increased the font size of every possible setting, not because I’m old or have vision problems, but because I was leaning in to read. The last step with the computer was to get rid of the mousepad, so I wasn’t extending my arm to grab the mouse. With no mousepad, I’m more likely to just pull the mouse right to the edge of the desk, which keeps my elbows by my side.

Add a chair-back pad

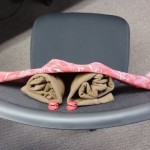
My office chair has a very curvy seat back, so it looks ergonomic. However, as you can see, it curves in on both sides, which pushes the shoulders forward instead of letting them relax back. I wanted the chair to support my spine, and get out of the way of my shoulders. I made a pad out of a rolled up shirt (the one I kept at my desk anyway for the summer thermostat wars) and held it in place with cubical clips that pin on to the chair back. I covered it with the second cloth napkin for maximum cuteness. 

Result

Now when I sit in the chair, my back is supported, my feet are supported, I’m not craning my neck forward, and my elbows hang at my sides, all of which lets my shoulder blades stay in a tingle-free spot on my back. This reduced the tingling by about 50%, which is awesome. Unfortunately, it also made it clear that I needed a chair with “seat depth” adjustment (my thigh bones or femurs are shorter than the seat, so my back can’t reach the back rest) so I put in an order for a new chair …but I picked one with a convex back rest and no arm rests.

The biggest lesson of physical therapy has been that there is no silver bullet. At first I tried to cheat, and just remove the armrests, or just do the one exercise that seemed the most important to me. I got no results that way. However, if the physical therapist gave me 7 things to do, and I picked 5 of them, I’d be on track…but the crazy part was, it didn’t matter which 5. There just needs to be a suite of improvements in place, doesn’t matter which ones. This is sort of annoying and sort of a relief, as medical advice and life lessons go. 

Learning about human anatomy has been the best part of having a medical problem! I found useful diagrams here: http://www.studyblue.com/notes/note/n/anatomy-muscles/deck/6174851

How to play announcements at a community meeting

We had an event where the host wasn’t able to project announcements (or any other content) during the gathering, but they were able to offer us a CRT TV on a cart with a DVD player, located strategically by the registration table. I had wanted to try out converting our email newsletter to a Prezi, and this was an invitation to take it one (that is, four) step(s) further and get the Prezi to play off a DVD. And I did it! Using my work machine (Windows 7) and some freeware, I achieved this result. I didn’t pay any software fees, but the process was a roundabout pain.

The terrible steps:

  1. Create an e-Newsletter in Constant Contact and send it out. 
  2. Open and “Print as pdf” the email containing the newsletter
  3. Convert pdf into images (png) with GIMP. Each layer must be saved as a separate image. (If you take screenshots of the email instead, which I originally thought would be easier, they don’t all load into to Prezi at consistent sizes, and there’s no fine-tuned scaling in Prezi. Must start with the pdfs.)
  4. Insert png’s into Prezi, crop and align to get the same appearance you got scrolling down the newsletter in email.
  5. Add frames and set slide order to make the Prezi progress through each item. We organized our newsletter in blocks, so this was easy to do. Now the Prezi is done. If you’re projecting from a laptop with internet, you are done. If you are playing this from a TV with a DVD player, onward!
  6. Export Prezi (only option is Adobe Flash).
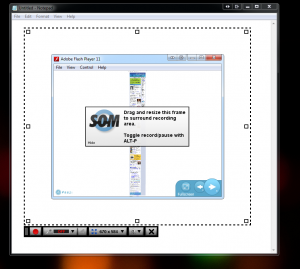
  7. Unzip Prezi files, open, start recording with Screencast-o-matic, and set the Prezi to auto-play. Make the Prezi display window smaller than SOM, because when you play this on an old TV, it’s going to cut all your margins off considerably. Maximize a blank Notepad file behind it for a white background, but in my case all that was cut off but the TV (including the frame of the flash window Prezi was in).
  8. “Save as avi” in Screencast-o-matic, then use Windows Movie Maker to edit off that bit at the beginning where you were setting it to play.
  9. Publish movie, “to this computer” (which saves it as an avi). Then open Windows DVD Maker, open that avi. Don’t forget Options in the lower right hand corner, which is where you indicate aspect ratio and to play back as a continuous loop. Burn the DVD. 

Tools used:

  1. Constant Contact
  2. Email client
  3. CutePDF
  4. GIMP
  5. Prezi
  6. Screencast-o-matic
  7. (Notepad)
  8. Windows Movie Maker
  9. Windows DVD Maker

Value added by looping announcements at a community meeting:

Questionable.

Greatest sense of accomplishment:

When I made a Prezi from a newsletter. That used a written resource I had created and turned it into a visual. After that, every additional step made my frowny-face frownier.